I am working on several projects at once, I’ll have lots to share soon as far as DIY and decorating, but in the mean time, in between some of my projects, I will be sharing posts on other subjects.
Because I am one person doing it all, I can’t do or share everything at once.
Today, I wanted to talk about how I edit my photos.
If you write a blog and share photos or even if you don’t, it is important to know how to edit photos.
I know it can be intimidating, but I am here to tell you that using Lightroom is not scary at all.
I do use PicMonkey, but I only use it for graphics.
I no longer edit my photos with PicMonkey.
My photos have come a long way since I started my blog.
I started out with a point and shoot camera, and then upgraded to a Sony DSLR camera.
Once I upgraded my camera, I started using PicMonkey to edit.
PicMonkey is a great too for editing photos, and you can do a lot with it.
But I was never completely satisfied with the way my photos were looking.
The color was way off, and and they still looked blurry.
I also wasn’t doing all that I could with PicMonkey, but I knew that I still had my limits using it.
I kept hearing about Adobe Lightroom and how easy it was to use.
I heard how great Lightroom was to use, but I was intimidated.
It looked too technical for me.
And I am NOT a technical person.
Well, I am here to tell you that Lightroom is very easy to use.
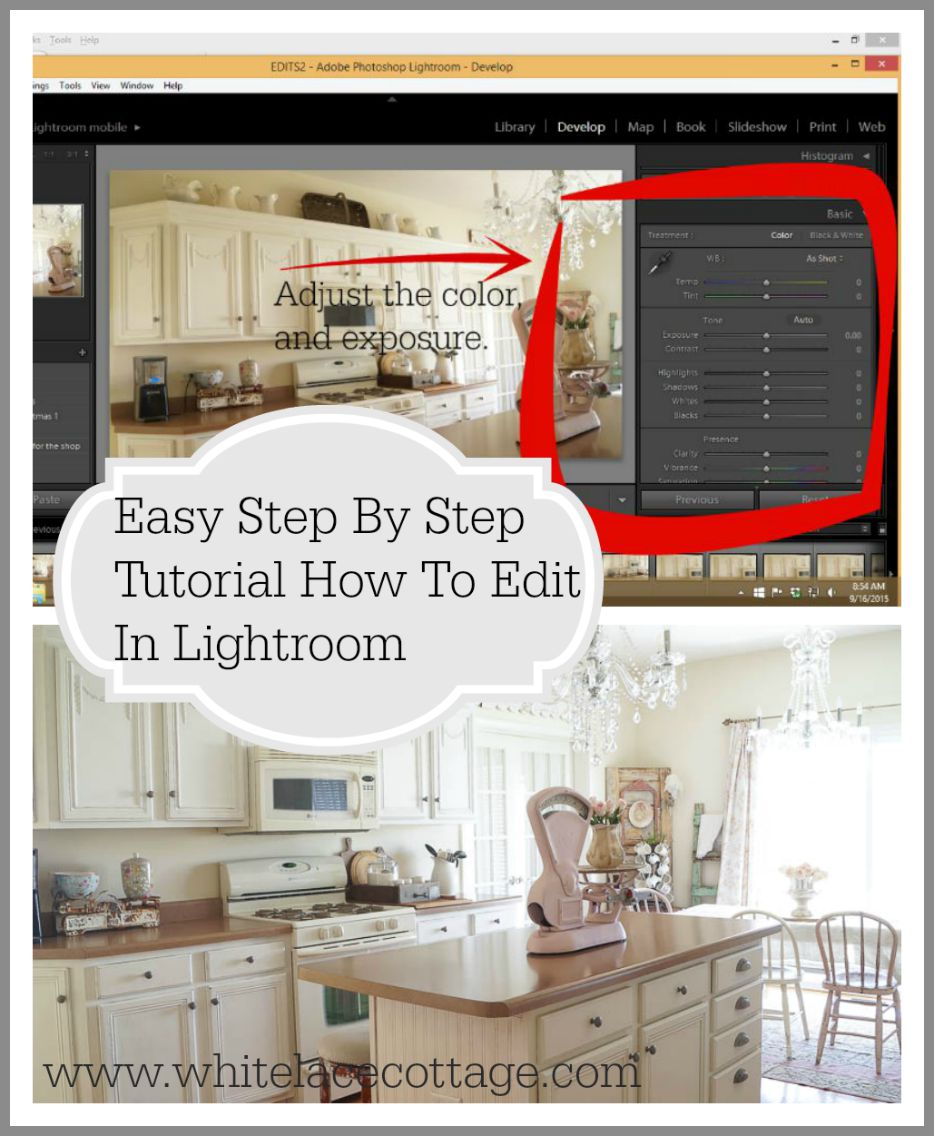
So today, I am going to share an easy step by step tutorial on how to edit in lightroom.
This is a basic tutorial on how to set up and use Lightroom.
(By the way this is not a sponsored post.)
I can’t remember for sure when I started using Lightroom.
But looking back a year ago at my photos, I wasn’t using it yet.
Let me show you a photo from a year ago, and then I will show you how easy this is to use.
Again, I am only sharing basic information, there’s so much you can do.
But anyone can use this program knowing just the basics.
And I am no expert, I am going to share what I do.
Here is a photo from last year.
You can see the photo is crooked, and it’s blurry, not very clear.
Here’s an updated version using Lightroom.
You can see the photo is much clearer and cleaner looking.
I probably could have straightened it even more.
But it’s still a huge difference in how the photo looks much less yellow and clear too, than it was using PicMonkey.
This is how you edit photos with Lightroom.
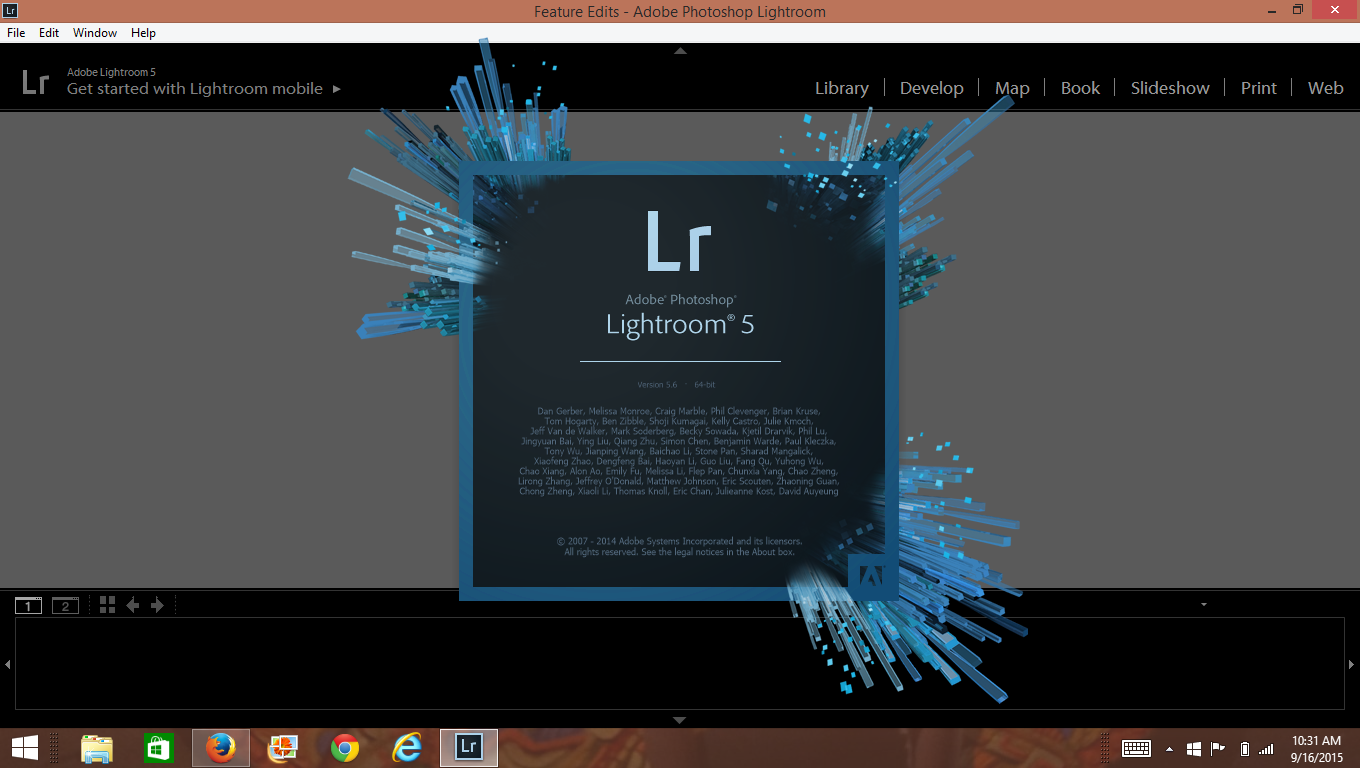
Open up Lightroom, click on file, then click on open new catalog.
Once you click on file, you will search for your photos in your library on your computer.
When you find your photos from your library click on it.
Below on that page fill in the file name. I always type in EDITS, so it’s easy to find.
Then click save.
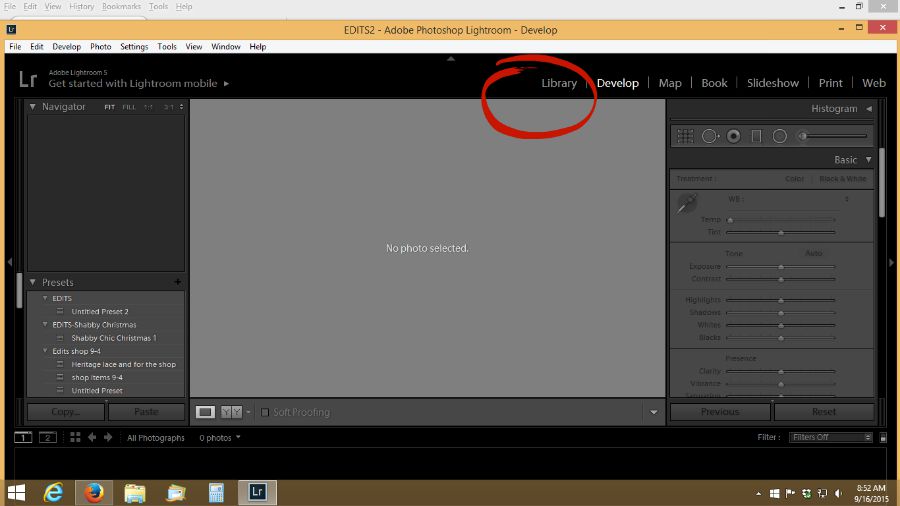
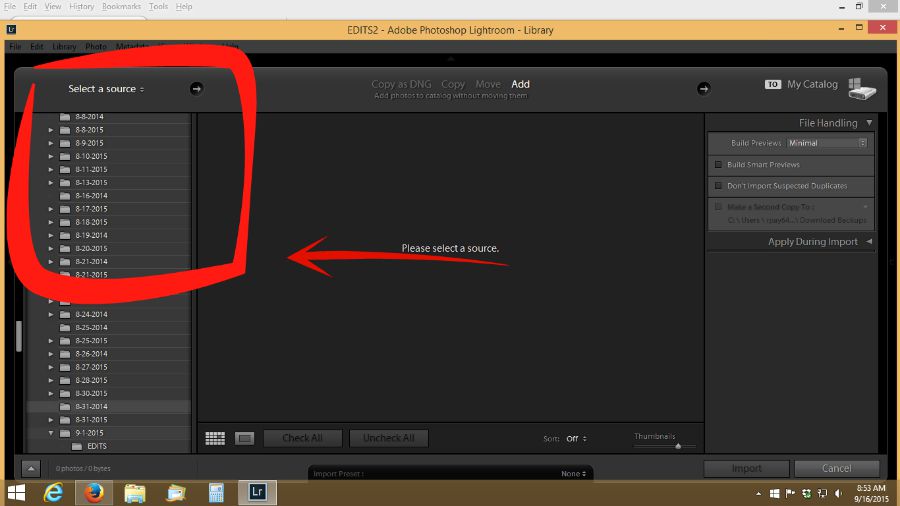
Once Lightroom opens back up, this page below will open up.
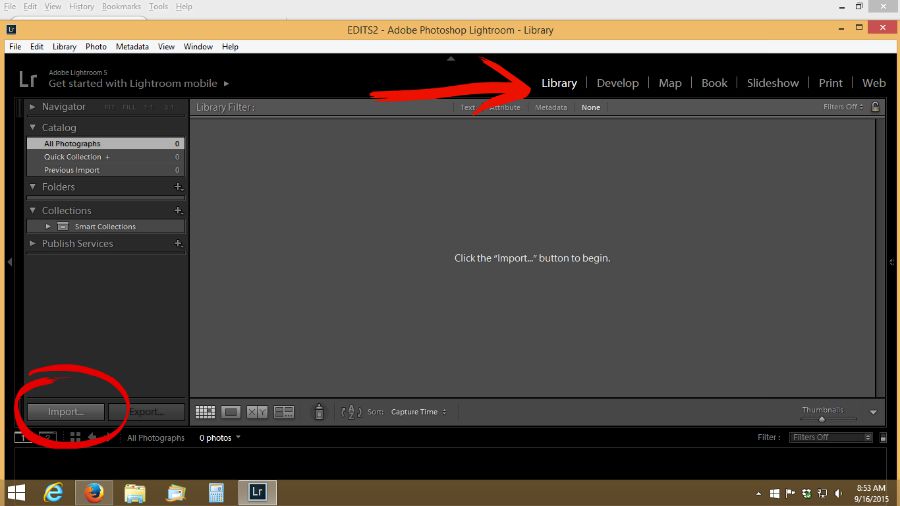
Click on library.
Once you are in library mode, click import.
Your screen will show the dates of your photo files.
Click on the date of the file you are editing.
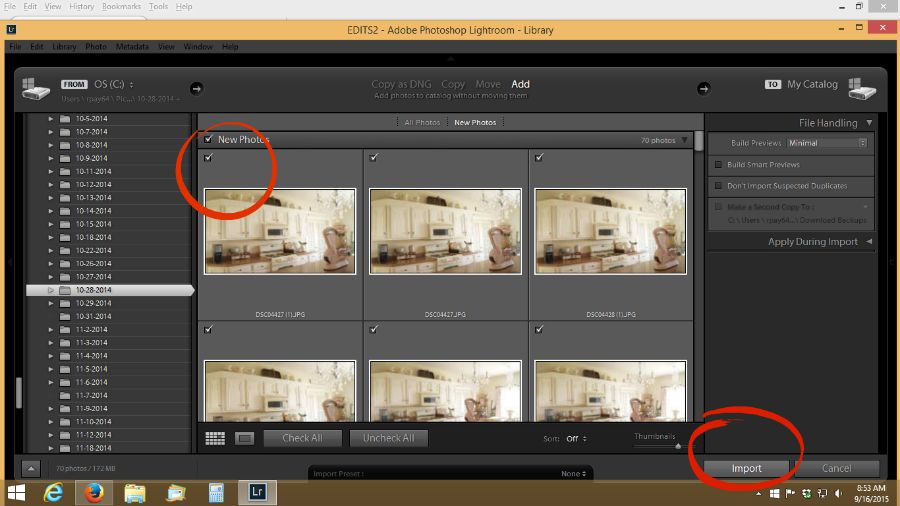
Those photos will pop up on your screen.
Once the photos pop up on your screen you can do two things.
You can go through all of your photos and uncheck the ones you don’t want to edit.
To uncheck, hover your mouse over the check and click it once.
Or you can skip this part and just click on import to start editing.
Either way once you get to this screen, click on import.
I don’t always go through and uncheck, I know I use up a lot of computer space by not doing it.
But I don’t always know if I want to keep a photo until I start editing them.
And when you uncheck it, it’s still in your file, you don’t lose the photo.
But you won ‘t be able to edit it in this session.
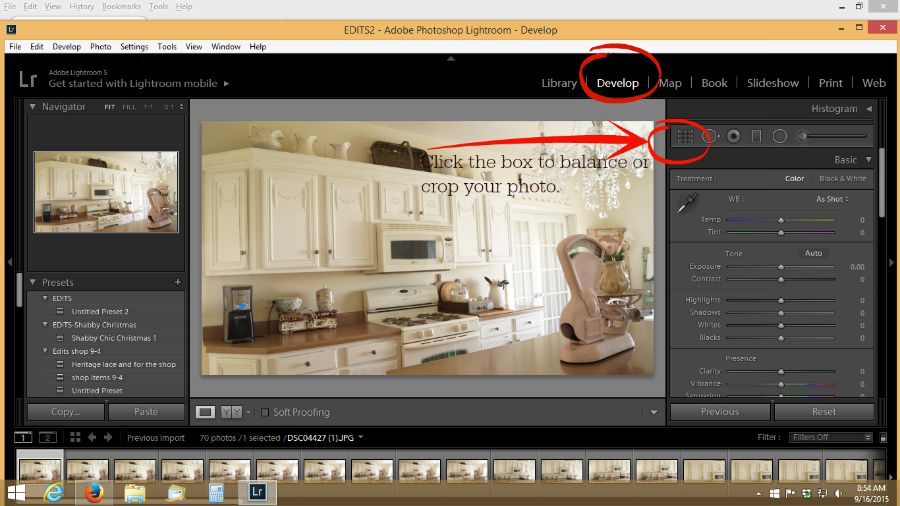
Next, click on develop to start editing.
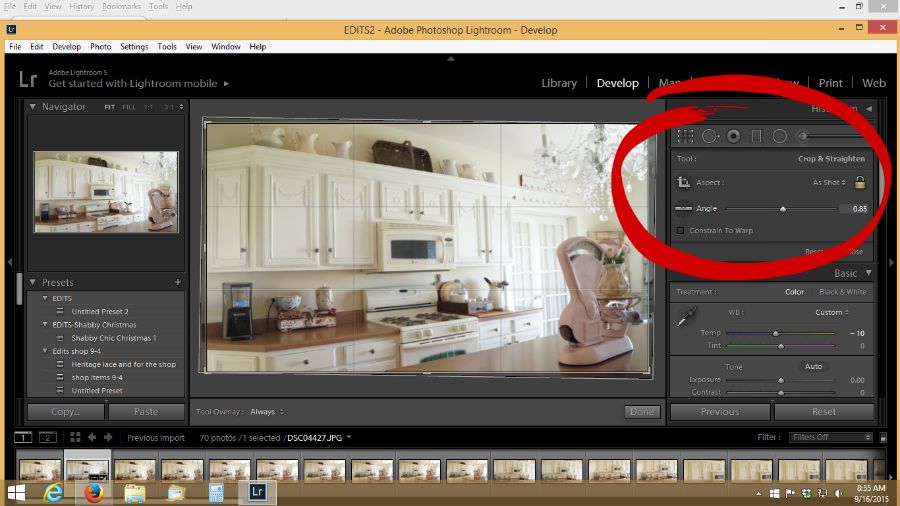
To straighten a photo so it’s more balanced, click on the box as shown in the photo below.
You can now adjust and straighten your photo just by sliding the cursor.
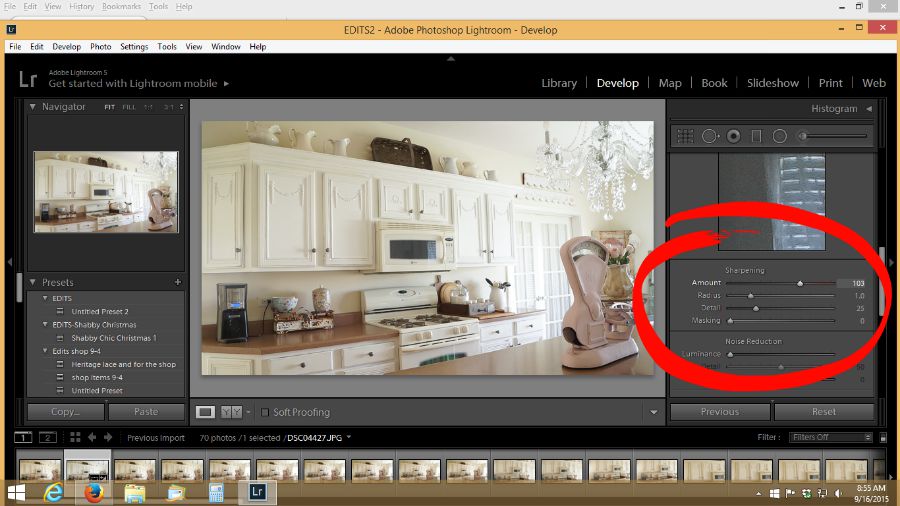
Next one of my secrets to clearer and cleaner photos is this tool.
To adjust your photos, move the cursor to the right.
How much depends on your photo, but do a little at a time.
The radius, detail and masking will automatically adjust as you adjust the amount of sharpening.
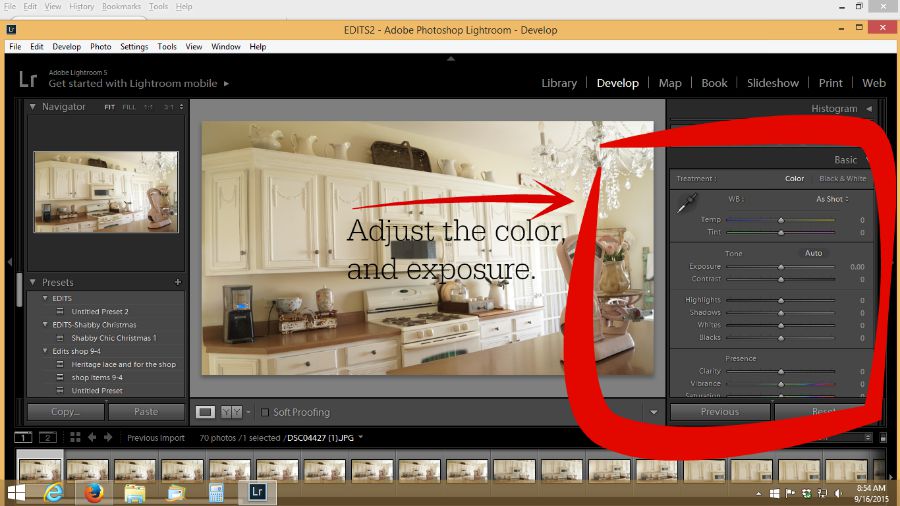
Now lets look a the color on the photo.
To adjust the temperature or exposure on your photo, just slide the cursor to the left or right.
For the temp, if you move it to the left of your photo will have cool tones, to the right warm tones.
So if you photo has a lot of yellow, you will move your cursor to the left.
The tint feature is the same, it adjusts your color.
The exposure will brighten a photo, and you can also adjust the highlights, shadows,whites, blacks.
I don’t mess with clarity, vibrance or clarity, but you can.
So as you go along to each photo, click on the photo, and the photo will pop up om your screen.
Continue editing all of your photos.
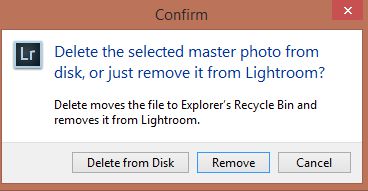
If you have a photo you don’t want to edit, right click, then click on remove photo.
This box will pop up asking you if you want to remove, delete from disk or if you changed your mind, press cancel.
If you choose remove it will remove it from this session, but not permanently.
If you choose delete from disk, it will remove it from your catalog.
I always choose delete from disk if it a really bad photo, that I know I don’t want.
And I choose remove if it’s a photo I want to edit, but not at this time.
Does that make sense?
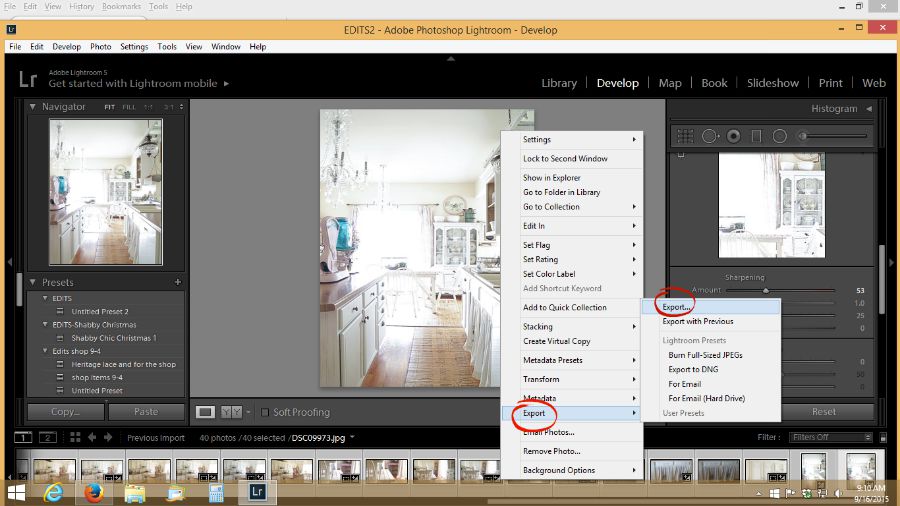
Once you are done editing, click Ctrl A, at the same time.
Your boxes of edited photos will be highlighted.
Next, right click, scroll down and choose export, then choose export again.
See the photo below.
A new page will open up.
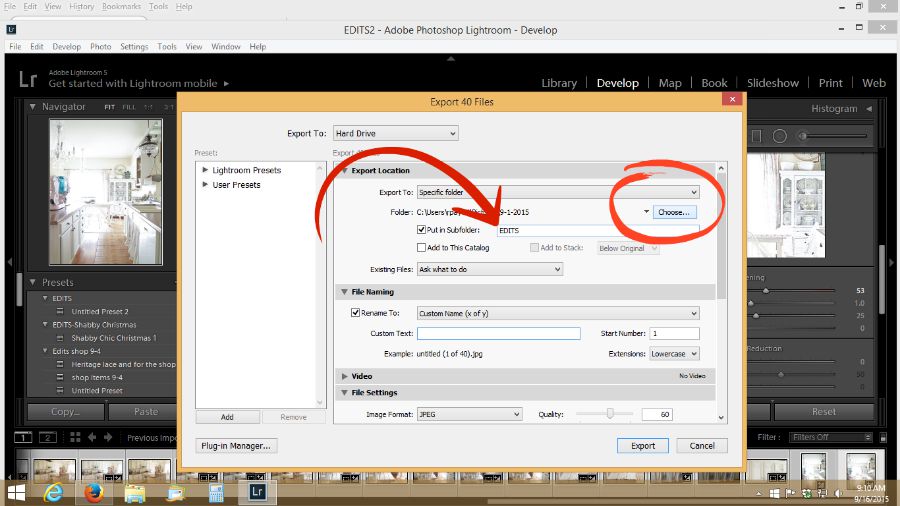
Make sure you check put in Subfolder, and label it EDITS.
Click on choose, that will open up your photo files once again.
When you find your file of photos that you just edited, right click on it once, don’t double click.
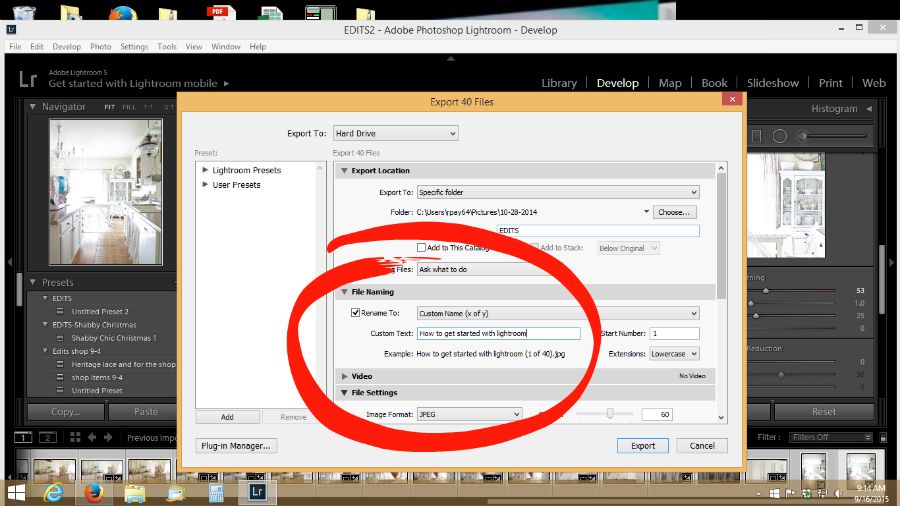
It will bring you back to this page.
Now we need to name our file.
If you are a blogger, make sure to choose something that’s great SEO.
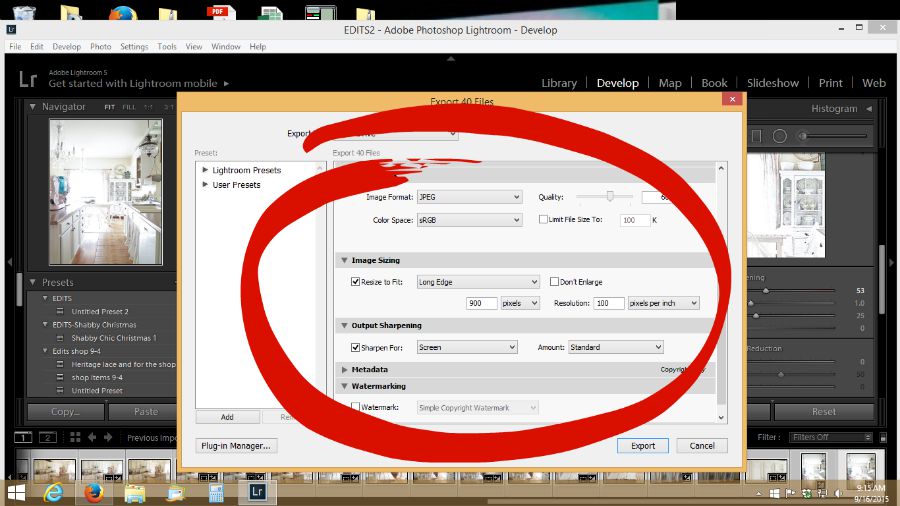
Here’s my photo size, you can determine what size works for you.
I do change this number as I need to, today this the size I am using.
This can get really technical, but I wanted to show you the basics, and how easy it really is to use.
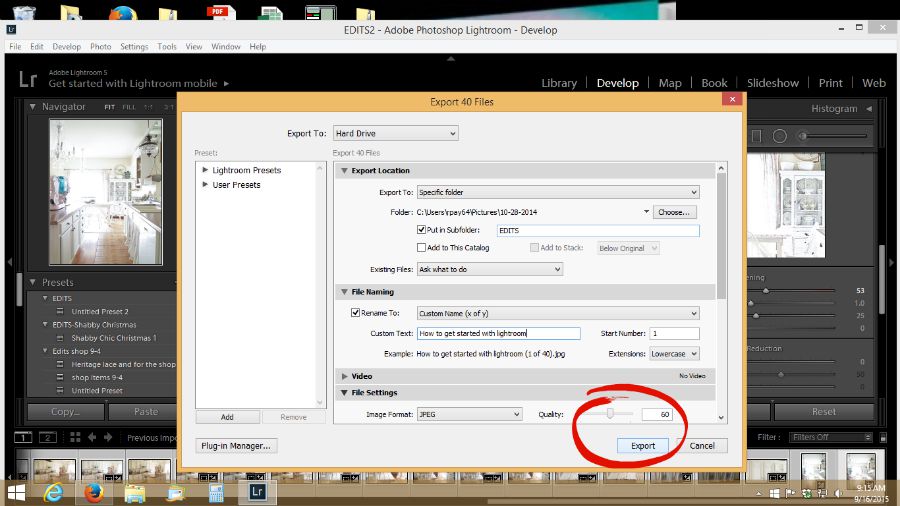
Now that we are done, lets save our photos.
Click on export.
And that’s it!
I hope I explained things simply.
I am a visual person, so for me graphics help.
There’s so much you can do with Lightroom.
You can also water mark your photos in Lightroom as well.
I no longer watermark my photos, with the exception of my larger Pinterest photos, I do that in PicMonkey.
I don’t like how my photos look and people have removed them from my photos.
It’s no guarantee that if you add a watermark, no one will take your photos.
Unfortunately it happens all too often.
It’s really sad, because this is my work, my art.
Stealing is just wrong!
Here are some before and after shots, you can really see the difference using Lightroom.
Before it’s crooked, unclear, and yellow.
After it’s brighter, very clear and straight.
Before very yellow, crooked, and not very clear.
Straighter, white, clear bright.
Which photo do you prefer?
I wanted to share this tutorial to take away some of the fear of editing photos in Lightroom.
I still use Picmonkey,and I think it’s a great tool.
But I think it has some limitations as to how clear and how good your photos can really look.
I only scratched the surface with Lightroom, there’s so much you can do with editing.
But these are the basic tools I use every time I edit my photos.
Hope this takes the fear out of editing photos using Lightroom.








Hi Anne, I have never hear of Light Room, your photos look clearer and lighter. I’ll go over and check it out. Thanks, Jo
Thanks so much Joanne! It’s a program you can purchase and download to your computer.
Thank you Anne for sharing this. I have never heard of Lightroom, I admire what you do with it !
You’re welcome Nathalie. I was so intimidated to use it, but honestly if you can use PicMonkey, you can use Lightroom.